Posted in Lightning, Lightning Component, Lightning Experience, Salesforce, Trailblazer

Hyperlink/Formula Fields In lightning:datatable

In many cases, while working with lightning:datatable we got challenge to display URL which redirect to record page and also for related lookup fields and formula fields. If it’s a Salesforce Id, a lookup to record or to some other record, and we would like to display it as a link with an appropriate value. Unfortunately, <lightning:dataTable> doesn’t have an Id column type, and the url type is not smart enough to realize it’s been handed a record Id and handle it.

Instead, we need to generate the URL ourselves and add it as a property of the line items in the source data. So for that one we have to use typeAttributes in column property.

Basically typeAttributes are the one of the major building blocks of <lightning:datatable>. This will help us to format the data types /output display and attaching some of actions to your data displayed in table at each cell level ,row level or at the columns level.

The typeAttributes are attached to each columns data type when your specifying the columns for your data table in your java script file. Each typeAttributes is having pre-defined set of attributes/properties basis on the data type of your column (your defining at the time of columns for table).

Hyperlink/Image Formula :

Here we have one formula field Demo Formula on Task where it will display task Priority name on click on that link it will redirect it to Task List view. So to use that formula in data table we have to do following.

Inside Column we have to set typeAttributes like below.

{
    label: 'Demo Formula',
    fieldName: 'DemoLink',
    type: "url",
    typeAttributes: {
        label: {
            fieldName: 'Priority'
        },
        target: '_blank'
    }
},
//For Image formula define colums like this.
{
    label: 'Status',
    fieldName: 'Status',
    cellAttributes: {
        iconName: {
            fieldName: 'statusIconName'
        },
        iconLabel: {
            fieldName: 'statusIconLabel'
        },
        iconPosition: 'right'
    }
}

Also inside response we have to handle it like below.

var records = response.getReturnValue();
records.forEach(function(record) {
    record.Priority = record.Priority;
    record.DemoLink = '/lightning/o/Task/home'; //Define here hyperlink as per formula field
    //For Image you can add icons dynamically like this.
    if (record.Status === 'Not Started') {
        record.statusIconName = 'standard:assignment';
        record.statusIconLabel = record.Status;
        record.Status = '';
    }
    if (record.Status === 'In Progress') {
        record.statusIconName = 'standard:investment_account';
        record.statusIconLabel = record.Status;
        record.Status = '';
    }

});
component.set("v.taskList", records);

Name/Lookup/Related Field :

For any related field or lookup/Name field we have to change both display name and link functionality. For example on Task we have WhatId so we have to display Related To name and we have to set hyperlink here. So to use that field in data table we have to do following.

Inside Column we have to set typeAttributes like below.

{
    label: 'Related To',
    fieldName: 'WhatId',
    type: 'url',
    typeAttributes: {
        label: {
            fieldName: 'WhatName'
        },
        target: '_blank'
    }
}

Also inside response we have to handle it like below.

var records = response.getReturnValue();
records.forEach(function(record) {
    record.WhatName = record.What.Name; //Here define your value which you want to display
    record.WhatId = '/' + record.WhatId ';// Here define where you want to redirect.

});
component.set("v.taskList", records);

Let’s try all together inside lightning component.

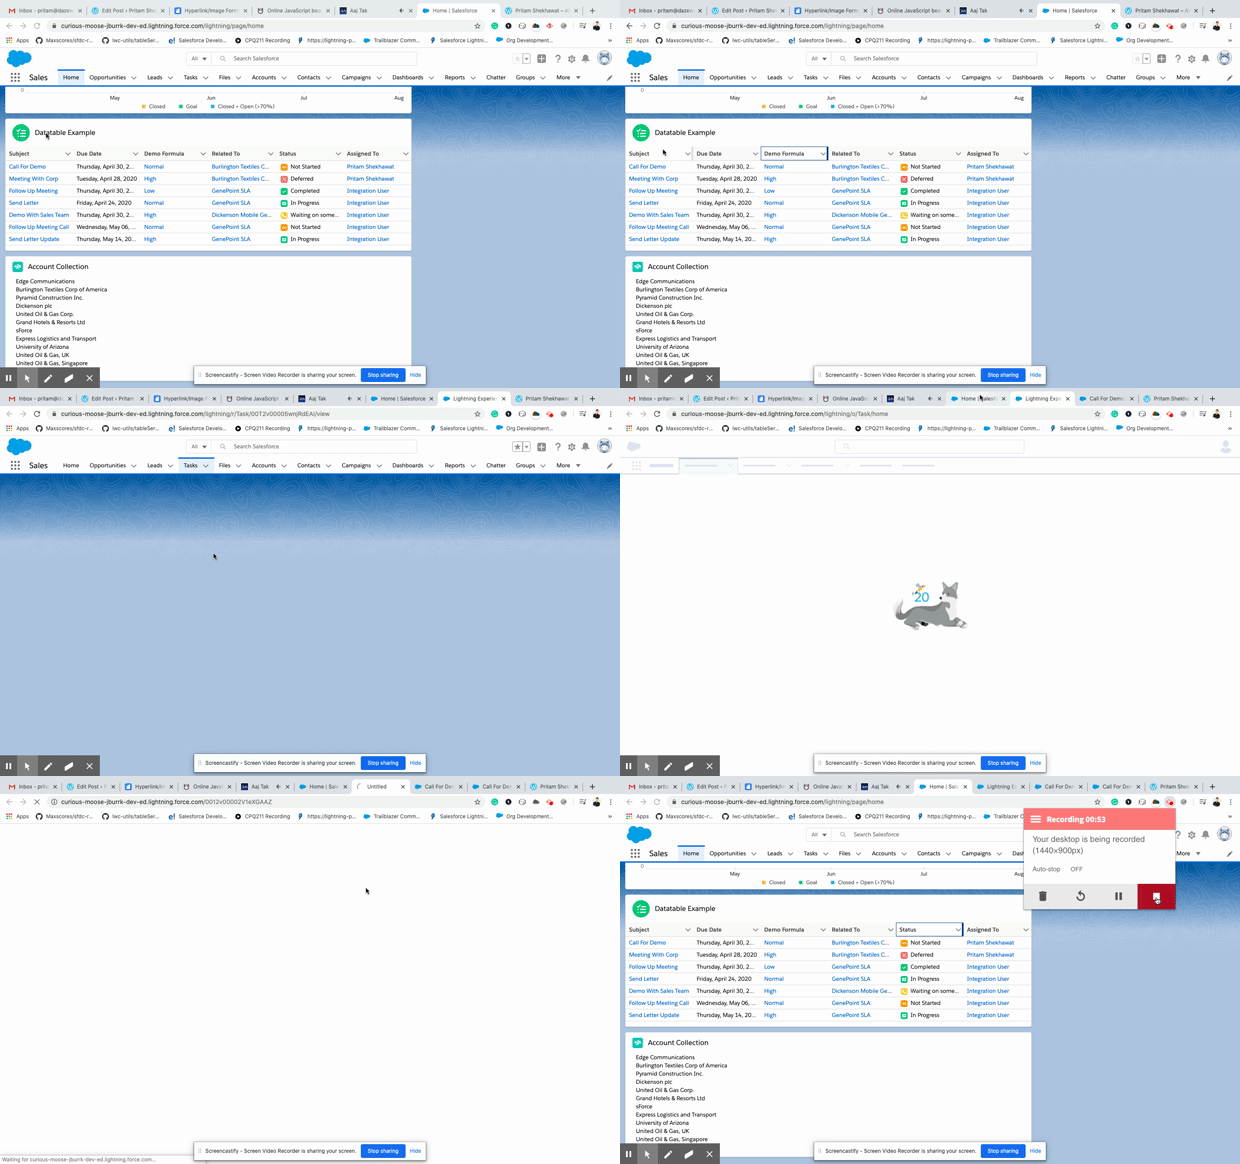
Here is component output.

Apex Class

public with sharing class TaskListController {
    @AuraEnabled(cacheable=true)
    public static List<Task> getTaskList() {
        return [SELECT Id,Subject, ActivityDate, What.Name, WhatId, OwnerId,Owner.Name FROM Task LIMIT 10];
    }
}

TaskList.cmp

<aura:component implements="force:appHostable,flexipage:availableForAllPageTypes" controller="TaskListController">          
    <aura:attribute type="Task[]" name="taskList"/>
    <aura:attribute name="mycolumns" type="List"/>
    
    <aura:handler name="init" value="{!this}" action="{!c.fetchTasks}"/>
     <lightning:card title="Datatable Example" iconName="action:new_task">
    <lightning:datatable data="{!v.taskList}" 
                         columns="{! v.mycolumns }" 
                         keyField="id"
                         hideCheckboxColumn="true"/>
    </lightning:card>
</aura:component>


TaskListController.js

({
    fetchTasks: function(component, event, helper) {
        component.set('v.mycolumns', [{
                label: 'Subject',
                fieldName: 'subjectLink',
                type: 'url',
                typeAttributes: {
                    label: {
                        fieldName: 'Subject'
                    },
                    target: '_blank'
                }
            },
            {
                label: 'Due Date',
                fieldName: 'ActivityDate',
                type: "date",
                typeAttributes: {
                    weekday: "long",
                    year: "numeric",
                    month: "long",
                    day: "2-digit"
                }
            },
            {
                label: 'Demo Formula',
                fieldName: 'DemoLink',
                type: "url",
                typeAttributes: {
                    label: {
                        fieldName: 'Priority'
                    },
                    target: '_blank'
                }
            },
            {
                label: 'Related To',
                fieldName: 'WhatId',
                type: 'url',
                typeAttributes: {
                    label: {
                        fieldName: 'WhatName'
                    },
                    target: '_blank'
                }
            },
            {
                label: 'Status',
                fieldName: 'Status',
                cellAttributes: {
                    iconName: {
                        fieldName: 'statusIconName'
                    },
                    iconLabel: {
                        fieldName: 'statusIconLabel'
                    },
                    iconPosition: 'right'
                }
            },
            {
                label: 'Assigned To',
                fieldName: 'OwnerId',
                type: 'url',
                typeAttributes: {
                    label: {
                        fieldName: 'OwnerName'
                    },
                    target: '_blank'
                }
            }

        ]);
        var action = component.get("c.getTaskList");
        action.setParams({});
        action.setCallback(this, function(response) {
            var state = response.getState();
            if (state === "SUCCESS") {
                var records = response.getReturnValue();
                records.forEach(function(record) {
                    record.WhatName = record.What.Name;
                    record.WhatId = '/' + record.WhatId;
                    record.Priority = record.Priority;
                    record.DemoLink = '/lightning/o/Task/home';
                    record.OwnerName = record.Owner.Name;
                    record.OwnerId = '/' + record.OwnerId;
                    record.subjectLink = '/' + record.Id;
                    if (record.Status === 'Not Started') {
                        record.statusIconName = 'standard:assignment';
                        record.statusIconLabel = record.Status;
                        record.Status = '';
                    }
                    if (record.Status === 'In Progress') {
                        record.statusIconName = 'standard:investment_account';
                        record.statusIconLabel = record.Status;
                        record.Status = '';
                    }
                    if (record.Status === 'Waiting on someone else') {
                        record.statusIconName = 'standard:call';
                        record.statusIconLabel = record.Status;
                        record.Status = '';
                    }
                    if (record.Status === 'Deferred') {
                        record.statusIconName = 'standard:first_non_empty';
                        record.statusIconLabel = record.Status;
                        record.Status = '';
                    }
                    if (record.Status === 'Completed') {
                        record.statusIconName = 'standard:task2';
                        record.statusIconLabel = record.Status;
                        record.Status = '';
                    }
                });
                console.log(records);

            }
            component.set("v.taskList", records);
        });
        $A.enqueueAction(action);
    }
})

Live Demo :
References:

Displaying image formula field in lightning data table

How to Hyperlink a Record in lightning:datatable?

Posted in Lightning, Lightning Web Component, LWC, Salesforce

Lightning Web Component for AURA Developers Part – III

Call Apex Methods In Lightning web components

Let’s discuss here how to call the apex class from the Lightning web components. Lightning web components can import methods from Apex classes into the JavaScript classes using ES6 import.Before you use an Apex method, make sure that there isn’t an easier way to get the data. Before calling apex method first review a base Lightning component, like lightning-record-form, lightning-record-view-form, or lightning-record-edit-form works for your use case.

We can able to call the apex class in Lightning web component using these different ways.

For more information take a look here

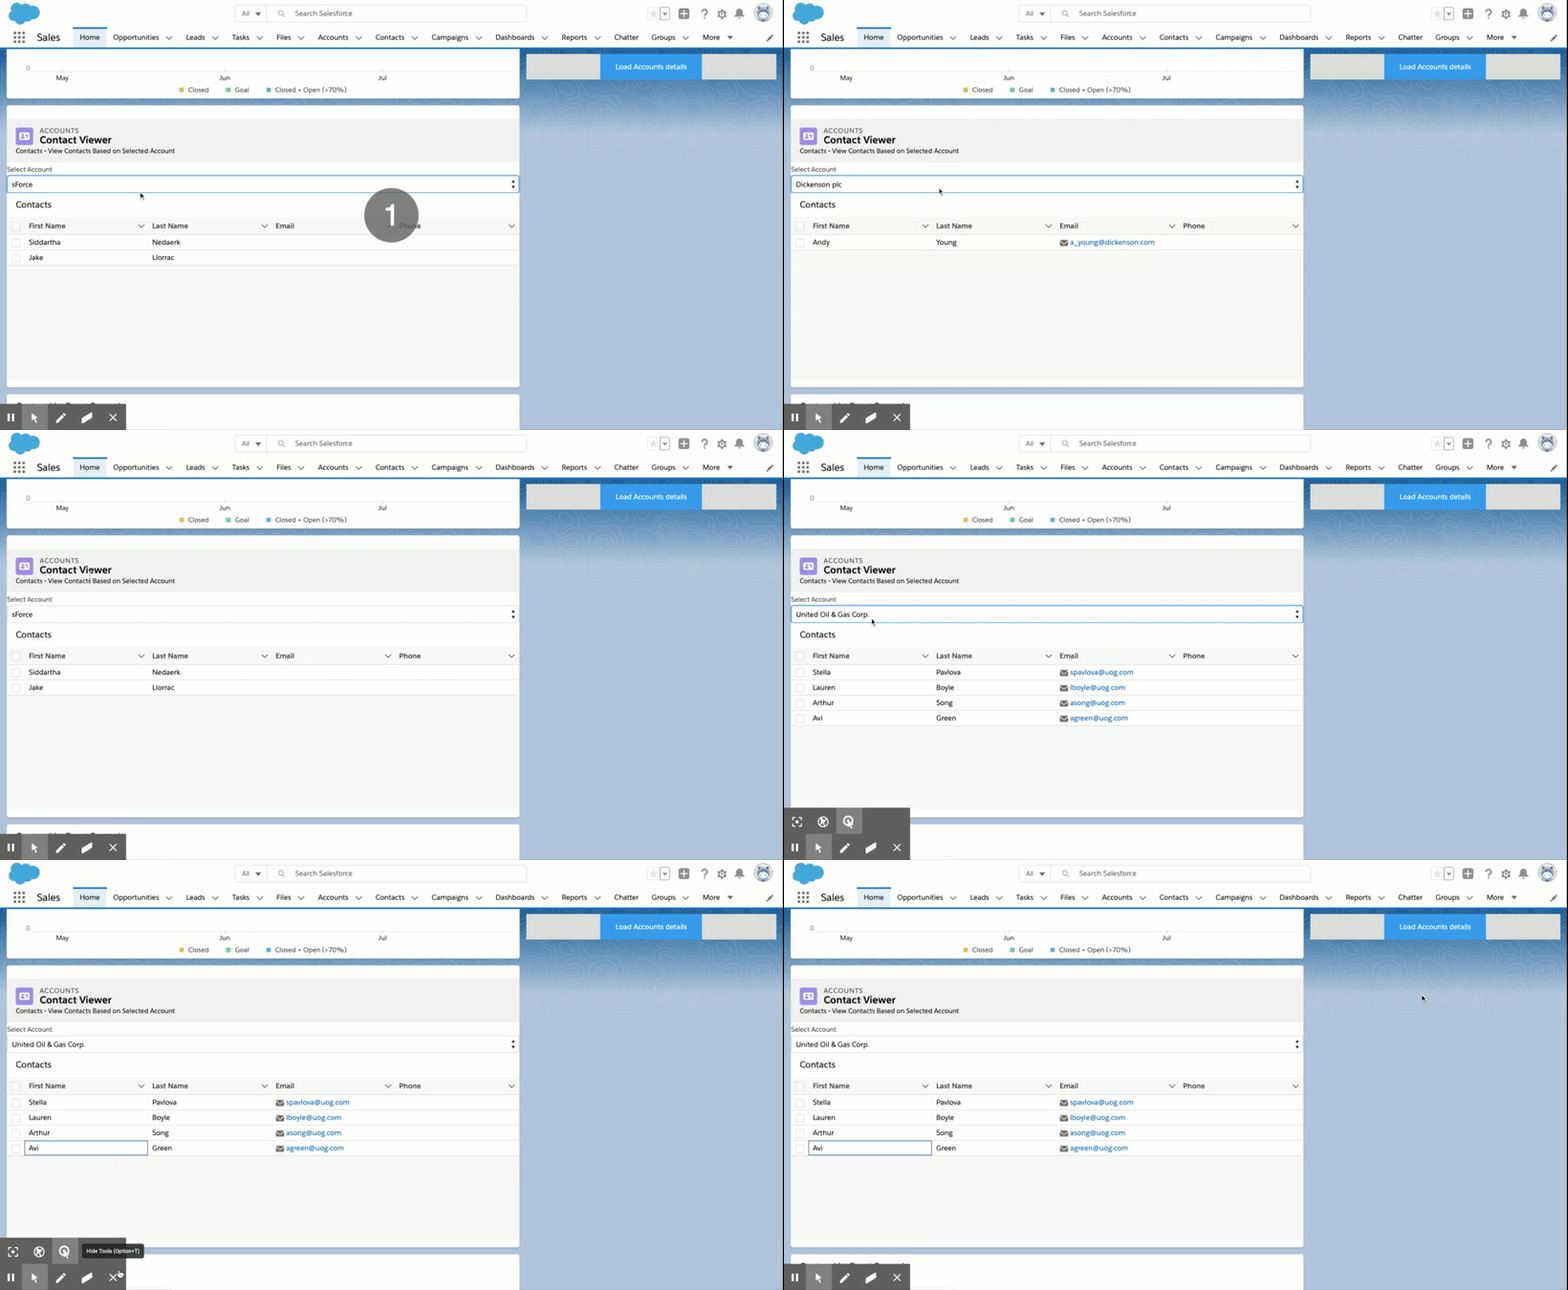
Here some of highlights of this component.

  1. This component is used to display list of Accounts in picklist.
  2. The component is used to display list of Contacts related to respective Account. User can select Account Name from dropdown to see list of related contacts.

Here you go step by step Instructions to create the Lightning Web Component

Import Syntax

You can able use default export syntax to import an Apex method via the @salesforce/apex scoped module into JavaScript controller class. The Syntax looks like below.

import apexMethod from '@salesforce/apex/Namespace.Classname.apexMethod';
  • apexMethod—The imported symbol that identifies the Apex method.
  • Namespace—The namespace of the Salesforce organization. Specify a namespace unless the organization uses the default namespace (c), in which case don’t specify it.
  • Classname—The name of the Apex class.

To use @wire to call an Apex method, we must set cacheable=true. But once we have used cacheable we cannot use DML in that. If an Apex method is annotated with @AuraEnabled(cacheable=true), you can invoke it from a component via the @wirewire service.You can @wire a property if you just wanna use the response as it is.

Create Apex Class

In this example, we will be getting account data and show it into the UI. Create an apex class using SFDX create apex class command.

public class AccountLWCController {
     @AuraEnabled(cacheable=true)
    public static List<Account> getAccountList() {
        return [SELECT Id, Name FROM Account];
    }
    @AuraEnabled
    public static List<Contact> getContacts(String accountId){
        return [Select Id,FirstName,LastName,Email,Phone from Contact where accountId=:accountId];
        
    }  
}

Let’s build the AccountList LWC

Create a new Lightning web component using the below SFDX command
sfdx force:lightning:component:create --type lwc -n AccountList -d force-app/main/default/lwc

accountList.html

<template>
    <lightning-card >
        <div class="slds-page-header slds-page-header--object-home">
            <lightning-layout>
                <lightning-layout-item >
                    <lightning-icon icon-name="standard:contact" alternative-text="Contact" ></lightning-icon>
                </lightning-layout-item>
                <lightning-layout-item class="slds-m-left--small">
                    <p class="slds-text-title--caps slds-line-height--reset">Accounts</p>
                    <h1 class="slds-page-header__title slds-p-right--x-small">Contact
                        Viewer</h1>
                </lightning-layout-item>
            </lightning-layout>
            <lightning-layout >
                <lightning-layout-item >
                    <p class="slds-text-body--small"> Contacts • View
                        Contacts Based on Selected Account</p>
                </lightning-layout-item>
            </lightning-layout>
        </div>
        <label class="slds-form-element__label" for="select-01">Select Account</label>
        <div class="slds-form-element__control">
            <div class="slds-select_container">
                <select class="slds-select" id="select-01" onchange={onValueSelection}>
                    <!--iterate all picklist values from accounts list using for:each loop-->
                    <template for:each={accounts.data} for:item="acc">
                        <option key={acc.Id} value={acc.Id}>
                            {acc.Name}
                        </option>
                    </template>
                </select>
            </div>
        </div>
        <template if:true={contacts}>
            <lightning-card title="Contacts"  >
                <div style="height: 300px;">
                    <lightning-datatable
                                         key-field="Id"
                                         data={contacts}
                                         columns={columns}>
                    </lightning-datatable>
                </div>    
            </lightning-card>
        </template>
    </lightning-card>
</template>

accountList.js

The component’s JavaScript code imports the Apex method.On selection of picklist onValueSelection get triggered and call the getContacts() method with accountId parameter. Once getContacts() get called it gives the response as Promise and will handle that using .then() and .catch() properties.

import { LightningElement,wire,track } from 'lwc';

import getAccountList from '@salesforce/apex/AccountLWCController.getAccountList';
import getContacts from '@salesforce/apex/AccountLWCController.getContacts';

const columns = [{
        label: 'First Name',
        fieldName: 'FirstName'
    },
    {
        label: 'Last Name',
        fieldName: 'LastName'
    },
    {
        label: 'Email',
        fieldName: 'Email',
        type: 'email'
    },
    {
        label: 'Phone',
        fieldName: 'phone',
        type: 'phone'
    }

];
export default class AccountList extends LightningElement {
    @track accountId = '';
    @track contacts;
    @track columns = columns;
    //  invoke apex method with wire property and fetch picklist options.
    // pass 'object information' and 'picklist field API name' method params which we need to fetch from apex
    @wire(getAccountList) accounts;
    onValueSelection(event) {
        // eslint-disable-next-line no-alert
        const selectedAccount = event.target.value;
        this.accountId = event.target.value;
        if (selectedAccount != null) {
            getContacts({
                    accountId: selectedAccount
                })
                .then(result => {
                    this.contacts = result;
                    // eslint-disable-next-line no-console
                    console.log('result' + JSON.stringify(result) + selectedAccount);
                })
                .catch(error => {
                    this.error = error;
                });
        }
    }
} 

accountList.js-meta.xml

To make sure component is visible in Lightning App Builder you need to add targets and change isExposed to true in LightningDatatableExample.js-meta.xml file:

<?xml version="1.0" encoding="UTF-8"?>
<LightningComponentBundle xmlns="http://soap.sforce.com/2006/04/metadata">
    <apiVersion>47.0</apiVersion>
    <isExposed>true</isExposed>
    <masterLabel>Account List</masterLabel>
  <description>This is a demo component.</description>
  <targets>
      <target>lightning__RecordPage</target>
      <target>lightning__AppPage</target>
      <target>lightning__HomePage</target>
  </targets>
</LightningComponentBundle>

Below is the output of component.

References:

Calling Apex class using LWC

Posted in Lightning Component, Lightning Web Component, LWC, Salesforce

Lightning Web Components for AURA Developers Part – II

The best way to compare the Aura Component and Lightning Web Components programming models is to look at code for similar components written in the two models. The goal of this post is to help you to leverage your Aura components skills to accelerate learning about Lightning web components. You learn how the two types of components work well together.

Prerequisites

Before you dive into this post, complete the Lightning Web Components Basics module, which gives you a great introduction to the new programming model.
I am assuming that you’re familiar with the Aura Components programming model, and we won’t explain its features, except in comparison to the Lightning Web Components programming model. If you’re not familiar with Aura components, start with the Aura Components Basics module.

Aura Initializers Become Lifecycle Hooks

Replace an init event handler in an Aura component with the standard JavaScript connectedCallback() method in a Lightning web component. The connectedCallback() lifecycle hook fires when a component is inserted into the DOM. Lifecycle hooks are callback methods that let you run code at each stage of a component’s lifecycle.We use the init event in an Aura component to initialize a component after component construction but before rendering.

Here’s an init event handler in the PropertyCarousel Aura component.

<aura:handler name="init" value="{!this}" action="{!c.onInit}"/>

The onInit function in the Aura component’s controller performs any necessary initialization.In a Lightning web component, use connectedCallback() instead in the component’s JavaScript file. Here’s an example inpropertySummary.js.

export default class PropertySummary extends LightningElement {
    ...
    connectedCallback() {
        // initialize component
    }
}

Migrate Base Components

This Aura component uses the lightning:formattedNumber base component.

<aura:component>
<lightning:formattedNumber value="5000" style="currency"
currencyCode="USD"/>
</aura:component>

To migrate this markup to a Lightning web component:

  • Change the colon that separates the namespace (lightning) and component name (formattedNumber) to a dash.
  • Change the camel-case component name (formattedNumber) to a dash-separated name (formatted-number).
  • Change the camel-case attribute name (currencyCode) to a dash-separated name (currency-code).

Here’s the equivalent Lightning web component.

<template>
    <lightning-formatted-number value="5000" style="currency"
      currency-code="USD" >
    </lightning-formatted-number>
</template>

Aura CSS Becomes Standard CSS

Lightning web components use standard CSS syntax. Remove the proprietary THIS class that Aura components use.
Here’s a portion of the CSS file for the PropertyTile Aura component.

.THIS .lower-third {
    position: absolute;
    bottom: 0;
    left: 0;
    right: 0;
    color: #FFF;
    background-color: rgba(0, 0, 0, .3);
    padding: 6px 8px;
}

Similar CSS for the propertyTile Lightning web component uses standard CSS instead. The THIS keyword is specific to Aura and isn’t used in Lightning web components.

.lower-third {
    position: absolute;
    bottom: 0;
    left: 0;
    right: 0;
    color: #FFF;
    background-color: rgba(0, 0, 0, .3);
    padding: 6px 8px;
}

Call Apex Methods

Here’s a portion of the js file for the calling apex method “getContacts” in Aura component.

var action = component.get("c.getContacts");
action.setCallback(this, function(data) {
    component.set("v.Contacts", data.getReturnValue());
});
$A.enqueueAction(action);

The JavaScript function calls the getContacts method of the Apex controller. It then populates the attribute named Contacts with the results.

Here’s a portion of the js file for the calling apex method “getContacts” in lightning web component.

import getContacts from '@salesforce/apex/ContactController.getContacts';

export default class ApexImperativeMethod extends LightningElement {
    @track contacts;
    @track error;

    handleLoad() {
        getContacts()
            .then(result => {
                this.contacts = result;
                this.error = undefined;
            })
            .catch(error => {
                this.error = error;
                this.contacts = undefined;
            });
    }
}

Also don’t forget to review awesome Salesforce Lightning Web Component Cheat Sheet (Unofficial) prepared by @Santanu Boral

References:

Lightning Web Components for Aura Developers

Working with Aura and Lightning Web Components: Interoperability and Migration

Posted in Release Notes, Salesforce, Summer19

Salesforce Summer’19: Top 19 Features of Lightning Experience

Salesforce published Summer’19 release(Preview) notes. If You are a lightning lover like me then In this release, you can find lot’s of new features as well as new enhancements, for example, Field History Tracking Report, LEX for iPad, Custom colors for Hyperlinks, Record view/Activity component new views, Surveys for free,Duplicate case merge.

Take a look below new features in Summer 19 released for Lightning Experience:

Register today for early access to the brand-new features. Sign up here

1.Keep Record Context When Switching from Salesforce Classic to Lightning Experience

When you switch from Salesforce Classic to Lightning Experience, you land on the same page in Lightning Experience, if it exists. If the same page doesn’t exist in Lightning Experience, you are redirected to your default landing page, which is determined by the org default or your customizations.

2.Power Up Your Related Lists with Enhanced Related Lists

Take your related lists to the next level. With Enhanced Related Lists, you can show up to 10 columns, resize and sort your columns, perform mass actions, and wrap text.

How: From the related lists component in the Lightning App Builder, select Enhanced List from the Related List Type dropdown (1). You can customize how many records to display at once, and choose whether to show the list view action bar.

Choosing Enhanced List affects all related lists in the component . To customize which columns appear in a particular related list, edit the related list in the page layout editor and add more fields.

Related list component in the Lightning App Builder with the Related List Type field highlighted. Underneath that image, an Account page with the enhanced related lists highlighted.

3.Access Lightning Experience from Safari on iPad Devices (Beta)

Give your users the ability to run the full desktop version of Lightning Experience on their iPad device when they’re away from their desktop or laptop.

How: In Setup, enter Lightning Experience in the Quick Find box, and then select Lightning Experience on iPad Browsers (Beta).

Lightning Experience on iPad Browsers (Beta) setup page, showing a toggle to enable the feature

4.See More in Item Menus on the Navigation Bar

We increased the number of recent items shown in item menus from three to five. We also made some styling enhancements, including bold section names and separators, to make it easier to tell the different sections apart.

Why: An object’s item menu now displays up to five items each in the Favorites, Recent records, and Recent lists sections.

A view of an Opportunities menu item showing five recent records

5.Assign Custom Colors to Hyperlinks

Complete the look and feel of your company’s theming and branding in Lightning Experience by defining a hyperlink color.

How: In Setup, enter Themes and Branding in the Quick Find box, and then select Themes and Branding. Update an existing custom theme or create a new one. For Link Color, select Use brand color.

Themes and Branding, New Custom Theme setup page, showing Link color’s Use brand color checkbox

6.Zoom Through Related Lists with Quick Filters

Use quick filters in your related lists to find the data that you’re looking for. Related list quick filters are different from regular list view filters in that they aren’t saved, persist only throughout your current session, and can’t be shared.

How: Open a related list, and select  to add quick filters.

Opportunities related list open quick filter icon highlighted and quick filter panel open.

Quick filters aren’t available for the Assets, File, Other Related People, and Attachments related lists. For Enterprise Territory Management users, quick filters are available only for Accounts and only in the Assigned Territories and Users in Assigned Territories related lists.

7.Choose from Two Record View Options

Now you have two record page view default options. Choose between the current view—now called Grouped view—and the new Full view. Full view displays all details and related lists on the same page. If you’re transitioning to Lightning Experience, this view is similar to Salesforce Classic.

A record page showing Full view and Grouped view

If you turn on Lightning Experience after Summer ’19, you configure these settings in the Lightning Experience Transition Assistant before you enable Lightning Experience, or in Setup after enabling Lightning Experience.In Setup, enter Record Page Settings in the Quick Find box, and select Record Page Settings.

8.Set Org Defaults for How Activities Display on Record Pages

Control how your users view activities on record pages. Set the default view to the newer expandable activity timeline, or choose the activities related lists view that will feel familiar to Salesforce Classic users. Users can switch between options whenever they want.

An example of an activity timeline

Related lists shows details for each task, event, and email in the Open Activities and Activity History related lists. Users who are familiar with Salesforce Classic might feel more at home working with the related lists activities view.

An example of a related lists view

How: To change the default activities view, in Setup, enter Record Page Settings in the Quick Find box, and select Record Page Settings.

Record Page Settings setup page, showing the Related Lists and Activity Timeline activities views

9.Send Surveys for Free

Licenses can be tricky, so we got rid of them. You no longer need a license to create and send surveys. Anyone who has been assigned one of the provided four profiles can create and send unlimited surveys for free.

Enable surveys, and assign one of the profiles to users who create and send surveys.

  • Contract manager
  • Marketing user
  • Standard user
  • System administrator

10.Merge Duplicate Cases (Beta)

Get rid of accidental copycats in your case list by merging up to three cases into one case. If the to-be-merged cases have different information in their case fields, you can choose which version you want to use in the merged case.

11.Path: Celebrate Sales Milestones

Help your teams celebrate their successes. Toss some virtual confetti when reps reach a designated path stage, for example, winning an opportunity. You can choose the frequency, such as always for those hard-won victories or only sometimes for daily occurrences. Celebrations don’t work on the status Converted on leads.

Screen full of confetti on an opportunity where the rep just reached Closed Won stage

How: In Setup, use the Quick Find box to find Path Settings. Enable Path and create a path, or edit one.

12.Add Opportunity Contact Roles More Efficiently in Lightning Experience

To add a contact role from within an opportunity, click Contact Roles, and then click Add Contact Roles. A list of all the contacts for the account appears.

Screen shot of Add Contact Roles screen

To assign or edit a primary contact for an opportunity, or modify contact roles, click Edit Contact Roles. The current primary contact is shown, along with a list of the opportunity contact roles that have already been added.

Screen shot of Edit Contact Roles screen

13.Filter and Search Events in List Views

Gone are the days of sales reps scrolling endlessly through their calendars to find events. Reps can find exactly what they need by using filters to customize their list views. Reps can use predefined list views to review their daily agenda, upcoming events, or recent events.

Why: Reps can scan events and details easily without clicking through weeks or months to get a better idea of what their calendar looks like.

View of upcoming events in the table view


14.Quip for Sales: Standardize Sales Processes Using Quip

Boost productivity throughout the deal cycle with collaborative docs directly inside Sales Cloud. Configure the Quip Document Lightning component to deploy customizable Quip document templates in context of your Sales Cloud record pages. With Quip templates, you can even use mail-merge syntax to auto-fill new documents with data from corresponding Salesforce fields.

If you haven’t already done it, connect Salesforce to Quip. In Setup, enter Quip in the Quick Find box, and follow the steps. Then launch Lightning App Builder, and add the Quip Document component to the Sales page that you want to update.

Account page showing red circles around a Quip Document embedded in the Acount Plan tab and the option to open document with Quip

15. Let Reps Choose Which Email Composer to Use When Clicking Email Addresses

When sales reps click an email address to write an email, the Salesforce email composer now opens by default. Reps can choose to have their computer’s default email composer open instead.

How: In personal settings, enter My Email Settings in the Quick Find box, then select My Email Settings. Select which composer you want to use when you click an email address.

My Email Settings

16.Choose to Get Task Notifications by Email

Sales reps can control whether they’re notified by email when they’re assigned a task. In personal settings, enter Activity in the Quick Find box, then select Activity Reminders.

My Email Settings

Increase Manager Productivity with a New Task Filter

Sales managers want to focus on the tasks that their team is working on. Now it’s easy to do with the My team’s tasks filter.Why: Within your list view, select the My team’s tasks filter.

Filter by owner

17.Evaluate Each Record in Reports with Row-Level Formulas (Beta)

With row-level formulas, you don’t need to export report data to a spreadsheet or ask an admin to create a one-off custom formula field. Instead, write a row-level formula directly in the Lightning report builder.

Add a row-level formula from the Columns section of the Overview pane by clicking  | Add Row-Level Formula (Beta)

Adding a row-level formula

Name the row-level formula column Time to Close .Choose Number as the Formula Output Type .Then write the formula.

CLOSE_DATE - DATEVALUE(CREATED_DATE)
Writing a row-level formula

The row-level formula appears as a column on the report.

A row-level formula in a report

How: Enable the row-level formulas beta feature from Setup. Enter Reports in the Quick Find box, then click Reports and Dashboards Settings. Select Enable Row-Level Formulas (Lightning Experience Only) and click Save.

18.Create Historical Tracking Reports In Lightning

You no longer need to switch back to Salesforce Classic to create meaningful reports on how your business is changing. Create, edit, and view all your historical tracking reports in Lightning Experience. Historical tracking reports (also called historical trending reports) help you capture changes in key business metrics over time.

19.Get Notified When Reports Conditions Are Met

Don’t wait to find out when an important aggregate in your Salesforce report reaches a meaningful threshold. When a change affects a report that you rely on, report subscribers can receive the updated information right away. For instance, set conditions to send email when average case age is greater than one day, or opportunity count rises above 100. Choose whether the email contains a summary of the conditions that were met or a summary plus the whole report.

Add conditions to your report subscriptions, and subscribers receive an email when the selected aggregates meet the specified thresholds.

Adding conditions to a report

References:

Salesforce Summer ’19 Release Notes 

Salesforce Summer19 release quick summary