Posted in Lightning, Lightning Component, Lightning Experience, Salesforce, Trailblazer

Hyperlink/Formula Fields In lightning:datatable

In many cases, while working with lightning:datatable we got challenge to display URL which redirect to record page and also for related lookup fields and formula fields. If it’s a Salesforce Id, a lookup to record or to some other record, and we would like to display it as a link with an appropriate value. Unfortunately, <lightning:dataTable> doesn’t have an Id column type, and the url type is not smart enough to realize it’s been handed a record Id and handle it.

Instead, we need to generate the URL ourselves and add it as a property of the line items in the source data. So for that one we have to use typeAttributes in column property.

Basically typeAttributes are the one of the major building blocks of <lightning:datatable>. This will help us to format the data types /output display and attaching some of actions to your data displayed in table at each cell level ,row level or at the columns level.

The typeAttributes are attached to each columns data type when your specifying the columns for your data table in your java script file. Each typeAttributes is having pre-defined set of attributes/properties basis on the data type of your column (your defining at the time of columns for table).

Hyperlink/Image Formula :

Here we have one formula field Demo Formula on Task where it will display task Priority name on click on that link it will redirect it to Task List view. So to use that formula in data table we have to do following.

Inside Column we have to set typeAttributes like below.

{
    label: 'Demo Formula',
    fieldName: 'DemoLink',
    type: "url",
    typeAttributes: {
        label: {
            fieldName: 'Priority'
        },
        target: '_blank'
    }
},
//For Image formula define colums like this.
{
    label: 'Status',
    fieldName: 'Status',
    cellAttributes: {
        iconName: {
            fieldName: 'statusIconName'
        },
        iconLabel: {
            fieldName: 'statusIconLabel'
        },
        iconPosition: 'right'
    }
}

Also inside response we have to handle it like below.

var records = response.getReturnValue();
records.forEach(function(record) {
    record.Priority = record.Priority;
    record.DemoLink = '/lightning/o/Task/home'; //Define here hyperlink as per formula field
    //For Image you can add icons dynamically like this.
    if (record.Status === 'Not Started') {
        record.statusIconName = 'standard:assignment';
        record.statusIconLabel = record.Status;
        record.Status = '';
    }
    if (record.Status === 'In Progress') {
        record.statusIconName = 'standard:investment_account';
        record.statusIconLabel = record.Status;
        record.Status = '';
    }

});
component.set("v.taskList", records);

Name/Lookup/Related Field :

For any related field or lookup/Name field we have to change both display name and link functionality. For example on Task we have WhatId so we have to display Related To name and we have to set hyperlink here. So to use that field in data table we have to do following.

Inside Column we have to set typeAttributes like below.

{
    label: 'Related To',
    fieldName: 'WhatId',
    type: 'url',
    typeAttributes: {
        label: {
            fieldName: 'WhatName'
        },
        target: '_blank'
    }
}

Also inside response we have to handle it like below.

var records = response.getReturnValue();
records.forEach(function(record) {
    record.WhatName = record.What.Name; //Here define your value which you want to display
    record.WhatId = '/' + record.WhatId ';// Here define where you want to redirect.

});
component.set("v.taskList", records);

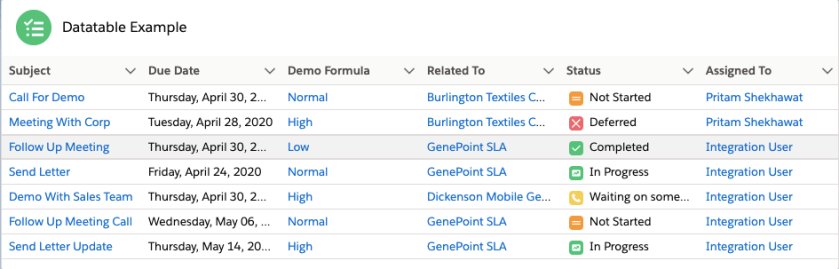
Let’s try all together inside lightning component.

Here is component output.

Apex Class

public with sharing class TaskListController {
    @AuraEnabled(cacheable=true)
    public static List<Task> getTaskList() {
        return [SELECT Id,Subject, ActivityDate, What.Name, WhatId, OwnerId,Owner.Name FROM Task LIMIT 10];
    }
}

TaskList.cmp

<aura:component implements="force:appHostable,flexipage:availableForAllPageTypes" controller="TaskListController">          
    <aura:attribute type="Task[]" name="taskList"/>
    <aura:attribute name="mycolumns" type="List"/>
    
    <aura:handler name="init" value="{!this}" action="{!c.fetchTasks}"/>
     <lightning:card title="Datatable Example" iconName="action:new_task">
    <lightning:datatable data="{!v.taskList}" 
                         columns="{! v.mycolumns }" 
                         keyField="id"
                         hideCheckboxColumn="true"/>
    </lightning:card>
</aura:component>


TaskListController.js

({
    fetchTasks: function(component, event, helper) {
        component.set('v.mycolumns', [{
                label: 'Subject',
                fieldName: 'subjectLink',
                type: 'url',
                typeAttributes: {
                    label: {
                        fieldName: 'Subject'
                    },
                    target: '_blank'
                }
            },
            {
                label: 'Due Date',
                fieldName: 'ActivityDate',
                type: "date",
                typeAttributes: {
                    weekday: "long",
                    year: "numeric",
                    month: "long",
                    day: "2-digit"
                }
            },
            {
                label: 'Demo Formula',
                fieldName: 'DemoLink',
                type: "url",
                typeAttributes: {
                    label: {
                        fieldName: 'Priority'
                    },
                    target: '_blank'
                }
            },
            {
                label: 'Related To',
                fieldName: 'WhatId',
                type: 'url',
                typeAttributes: {
                    label: {
                        fieldName: 'WhatName'
                    },
                    target: '_blank'
                }
            },
            {
                label: 'Status',
                fieldName: 'Status',
                cellAttributes: {
                    iconName: {
                        fieldName: 'statusIconName'
                    },
                    iconLabel: {
                        fieldName: 'statusIconLabel'
                    },
                    iconPosition: 'right'
                }
            },
            {
                label: 'Assigned To',
                fieldName: 'OwnerId',
                type: 'url',
                typeAttributes: {
                    label: {
                        fieldName: 'OwnerName'
                    },
                    target: '_blank'
                }
            }

        ]);
        var action = component.get("c.getTaskList");
        action.setParams({});
        action.setCallback(this, function(response) {
            var state = response.getState();
            if (state === "SUCCESS") {
                var records = response.getReturnValue();
                records.forEach(function(record) {
                    record.WhatName = record.What.Name;
                    record.WhatId = '/' + record.WhatId;
                    record.Priority = record.Priority;
                    record.DemoLink = '/lightning/o/Task/home';
                    record.OwnerName = record.Owner.Name;
                    record.OwnerId = '/' + record.OwnerId;
                    record.subjectLink = '/' + record.Id;
                    if (record.Status === 'Not Started') {
                        record.statusIconName = 'standard:assignment';
                        record.statusIconLabel = record.Status;
                        record.Status = '';
                    }
                    if (record.Status === 'In Progress') {
                        record.statusIconName = 'standard:investment_account';
                        record.statusIconLabel = record.Status;
                        record.Status = '';
                    }
                    if (record.Status === 'Waiting on someone else') {
                        record.statusIconName = 'standard:call';
                        record.statusIconLabel = record.Status;
                        record.Status = '';
                    }
                    if (record.Status === 'Deferred') {
                        record.statusIconName = 'standard:first_non_empty';
                        record.statusIconLabel = record.Status;
                        record.Status = '';
                    }
                    if (record.Status === 'Completed') {
                        record.statusIconName = 'standard:task2';
                        record.statusIconLabel = record.Status;
                        record.Status = '';
                    }
                });
                console.log(records);

            }
            component.set("v.taskList", records);
        });
        $A.enqueueAction(action);
    }
})

Live Demo :

References:

Displaying image formula field in lightning data table

How to Hyperlink a Record in lightning:datatable?

Posted in Lightning Experience, Release Notes

Salesforce Winter’19: Top 19 Features of Lightning Experience

Salesforce published Winter’19 release(Preview) notes. If You are a lightning lover like me then In this release, you can find lot’s of new features as well as new enhancements, for example,Lightning Experience Configuration Converter ,View Page Performance, Filter Search Results,Email Tracking in Lightning.

My Post (1).jpg

Take a look below new features in Winter’ 19 released for Lightning Experience:

1.Change Your View with Display Density Settings

Two new Lightning Experience display density settings give you more control of how you want to view data without changing the page layout. Select one of the settings as the default, but users can choose their own display density at any time from the user profile menu.The Compact setting, which has labels to the left of fields and less space between page elements, fits 30% more fields on the page.

Compact view

Comfy has labels on the top of fields and more space between page elements. It’s similar to previous versions of Lightning Experience.

Comfy view

Existing orgs have Comfy as the default setting. New orgs created after Winter ‘19 is released might default to Compact.

Setup: From Setup in Lightning Experience, enter Display Settings in the Quick Find box, and then select Display Settings. The org default setting applies, unless a user changes it from their profile menu. You can’t override a user’s display density preference.

2.Assign a New Owner to Multiple Leads, Cases, or Custom Objects at One Time

Use the Change Owner page-level button to assign a new owner for up to 200 selected leads, cases, or custom objects. You can access the button in the page-level action menu in a list view or related list in standard table mode, or in Related List Quick Links.Change Owner button in more actions drop-down in page-level actions menu

3.Find the Data You Need with List View Search

Use the new search bar to search the field data in your list views and find the records you need in record time.The list view search bar appears next to the List View Controls icon. Use the keyboard shortcut g+f to select the search bar. You can also add the search bar to the List View component in Lightning App Builder.The search bar works across all applicable fields for all the records in the list, even if specific columns aren’t visible.

Oppotunity page with search bar highlighted

4. Field History Tracking Data Deleted After 18 Months

Salesforce guarantees to retain your field history data for up to 18 months. Starting with the Winter ’18 release, it no longer retain field history beyond 18 months. To retain field history longer, you can purchase the Field Audit Trail add-on.

After the Winter ’18 release, you have a few months grace period to act.

  • To guarantee that you have access to your field history data, purchase the Field Audit Trail add-on. Field Audit Trail lets you define a policy to retain archived field history data up to 10 years from the time the data was archived. To purchase Field Audit Trail, contact Salesforce Customer Support.
  • Use the queryAll() API to retrieve deleted field history during the grace period and create your own backup. You can’t use the getDelete() API to retrieve data that Salesforce deletes following the 18-month limit.
  • If you need help retrieving your field history during the grace period, contact Salesforce Customer Support.

Recover Your Unsaved Text After Getting Timed Out

Sometimes  Lightning Experience session is interrupted, whether you’ve been inactive too long or you lost your connection. You used to see the same timeout message, regardless of how your session ended. Now the message that pops up is specific to your scenario and tells you how to recover unsaved text.If your session is interrupted, return to the page to copy unsaved text, like a Chatter post, so you don’t lose it during a new session.

session timeout message

5.Learn Why Users Are Switching Back to Salesforce Classic

Discover why your users aren’t adopting Lightning Experience by going to the source.The feedback form appears when users switch to Salesforce Classic. Choose whether to keep the default feedback question or write your own. Select how often the form appears and in which public Chatter group to store the feedback.

Users write the reason, which is posted in your chosen public Chatter group. Users are notified in the form that their feedback is shared in a public group where everyone can contribute to the conversation and see other commonly asked questions. Users aren’t required to add feedback before switching back to Salesforce Classic.

Feedback form

Enable : From Setup in Lightning Experience, enter Onboarding in the Quick Find box, and then select Onboarding & Assistance. Turn on the feature under Switch to Salesforce Classic Feedback Form.

6. Roll Out the Welcome Mat for New Lightning Experience Users

The first time that users log in to Lightning Experience they’re presented with useful resources for getting up and running quickly. You can customize the content to introduce the targeted resources that your users need.

Why: Help users ramp up quickly and reap all the productivity benefits of Lightning Experience. Users can also access these helpful resources at any time on any page by selecting Welcome to Lightning Experience from the Help menu.

First time log in welcome mat

Two different welcome mats appear: one when a user first logs in to Lightning Experience, and another when a user is automatically switched from Salesforce Classic to Lightning Experience. Both types of welcome mats are updated when you use custom content. You can use parameters to customize the content of the welcome mats individually.

Enable/Disable : From Setup in Lightning Experience, enter Onboarding in the Quick Find box, and then select Onboarding & Assistance. Find the Lightning Experience Welcome Mats section. The welcome mat is enabled and displays the default resources created by Salesforce. To display a custom welcome mat, create a CSP trusted site before updating.

7.Keep Users in Lightning Experience

Ready to adopt Lightning Experience for your org? Keep all users who have the Lightning Experience permission in the new interface by removing their ability to switch to Salesforce Classic.

How: From Setup in Lightning Experience, enter Lightning in the Quick Find box, and then select Lightning Experience. In the Lightning Experience Migration Assistant, on the Set Up Users tab, turn on Keep Lightning Experience Users in Lightning Experience Only. If some of your users still need access to both interfaces, use the Hide Option to Switch to Salesforce Classic permission instead.

8.Move Actions and Buttons Easily When Transitioning to Lightning Experience (Beta)

Don’t have time to move all your Salesforce Classic actions and buttons into Lightning Experience? The latest Lightning Experience Configuration Converter feature does just that in a simple. Easily move custom, standard, and global actions from the Quick Actions in the Salesforce Classic Publisher section of a page layout to the Salesforce Mobile and Lightning Experience Actions section.

How: The Lightning Experience Configuration Converter is a standalone tool that lives outside of Salesforce. We recommend that you run it in a sandbox or Developer org first, then migrate your changes to your production org. To get started, visit https://lightning-configuration.salesforce.com/ and log in with your org credentials.

Untitled.png

9.View Page Performance by Browser and Other New Metrics in the Lightning Usage App

You can now view more metrics in the Lightning Usage App, including page performance by browser. You can also generate reports using the Lightning Usage App objects. To view the 10 pages where switches occur most frequently, click Switches to Classic and scroll to the Page pane.
Top ten pages where switches occur


  • To view page performance by browser, click Browser. The Performance pane displays page load times by browser for the previous 3 months and the previous 7 days.
Browser performance for past three months and past seven days

Page load time, or Experienced Page Time (EPT), is a measure of how long it takes for a page to load so that a user can meaningfully interact with it. EPT is equivalent to “critical-path” or “time-to-interaction”. Complex pages usually have higher EPT values (longer load times).

  • To view the performance of the top-viewed pages in Lightning Experience, click Page. The Performance pane shows the page load times for the most viewed pages, and the page load times of a selected page for the previous 30 days.
Performance of most viewed pages

10.Filter Search Results by Number Range

When the numbers matter, use filters to frame your search results. For example opportunities that fall within a certain amount or probability range.On the search results page, click Opportunities in the sidebar to see the available filters. Enter your target range, and click the magnifying glass.

Opportunity search results filtered by probability range and amount range

How: From Setup, in the Object Manager, go to Search Layouts for each object. Add the fields that users want to filter to the Search Results layout. You can’t filter encrypted fields.

11. Accounts: Add Multiple Account Team Members Faster in Lightning Experience

If you’ve enabled account teams, no additional setup is required to see these updates. When sales reps want to add team members from the Account Team related list on an account, they click Add Team Members. Then reps fill in the available fields for all new account team members and click Save.

Add account team members window showing multiple users and related fields

12.Leads: Reject Leads That Don’t Use reCAPTCHA

Stop spammers from sending you bogus leads. Reject leads that generate from Web-to-Lead that don’t use reCAPTCHA verification. In Setup, go to the Web-to-Lead Setup page, and look for the Require reCAPTCHA Verification setting. Enabling this setting turns on the Include reCAPTCHA in HTML setting on the Create a Web-to-Lead Form page. Then make sure that the HTML on your website includes the reCAPTCHA code.

Screen shot of the Web-to-Lead Setup page.

13.See Your Email Impact with Email Tracking

Get a 360-degree view of email activity and customer engagement. In the activity timeline and the email detail record, reps can quickly see if an email isn’t being tracked or when a tracked email was last opened. Tracking information is visible in the activity timeline.

Email tracking information

Reps can see if an email is not tracked at all; when it was last opened, or if it is tracked but unopened.

Email tracking details

If you want, add the First Opened and Last Opened fields to your email page layouts to see the information there, too.To collect and display email tracking information, you must enable Enhanced Email and Email Tracking. From Setup, enter Enhanced Email in the Quick Find box, then select Enhanced Email. Click Enable. From Setup, enter Activity Settings in the Quick Find box, and then select Enable Email Tracking.

Bounce Back from Email Bounces

Now reps know which lead, contact, or person account has a bad email address, and they know which specific email wasn’t delivered.A bounce warning appears next to the email address in lead, contact, and person account record.

Email bounce information

14.Schedule Event Series (Beta)

Let your reps schedule daily, weekly, monthly, or other repeating events from Lightning Experience and the Salesforce app.To let your reps schedule event series, on the page layout for events, add Repeat.Then, to schedule a series, reps can select Repeat.

New event page showing repeat checkbox

15.Add and Remove Meeting Participants from Any User Interface

Attendees (in Lightning Experience) and invitees (in Salesforce Classic) are linked to the same data, so updating those fields should be simple. Now when you set up sales reps to work with attendees from Lightning Experience and the Salesforce app, they don’t lose access to edit invitees from Salesforce Classic.

How: To let reps update meeting participants from any user interface, add the attendee field to the page layout for events.

16.Enjoy a Better Interface with Enhanced Run Page (Beta)

Want a faster way to review or hide a report’s count of rows, detail rows, subtotals, and grand total? We’ve included toggles for each of these options in the enhanced run page (1). The new interface also shows you the report type a report is based on (2). And, the Filters pane now displays the cross filters added to the report (3).

Improved Enhanced Run Page Interface

How: Click Switch to Enhanced Run Page (Beta) in Reports. If you need to switch back, click Switch to Legacy Run Page.

17. Edit Joined Reports with Lightning Report Builder (Beta)

Enhance your joined report workflow by editing joined reports with the Lightning report builder and with more run page functionality including filtering and sorting.

  • To view joined reports in Lightning Experience, you need the Run Reports user permission.
  • To create or edit joined reports, you need one of these permissions: Create and Customize Reports, Report Builder, or Report Builder (Lightning Experience).

How: If necessary, turn on the Lightning joined reports beta. From Setup, enter Reports in the Quick Find box, then select Reports and Dashboards Settings. Select Enable Lightning Joined Reports (Beta), and then click Save.To edit a joined report with the Lightning report builder, click Edit (Beta).

Editing a joined report (beta)

Work with joined reports on the joined report run page just like you work with other reports in Lightning Experience. For example, to work with filters, click Filter.

Running a joined report (beta)

18. Add Up to 50 Values to Each Dashboard Filter

Dashboard filters let you shine a light on specific parts of your business. Previously, you could add up to 10 distinct values (like State equals California) to a dashboard filter. Now you can add up to 50 distinct values to each dashboard filter.

Adding 50 filter values

19. Customize Axis Ranges on Dashboard Charts

Choose the range of the x- and y-axes on dashboard charts, You can only set custom ranges on axes that display a numeric field. Edit or add a dashboard component, then customize the range by selecting Custom under the X-Axis Range or Y-Axis Range. Choose both a Min and a Max range, or set only one and Salesforce sets the other for you. Some charts only let you customize the x- or y-axis. For example, horizontal bar charts let you customize only the range of the x-axis.
Setting a custom range

There are many more powerful features in Winter’19 Release notes. For complete list of Winter’19, Release Notes click here   

I will soon share Winter’19 Top Lightning Component features as well so stay tuned 🙂

Also review Winter19 release quick summary  by Salesforce MVP Rakesh Gupta.

Posted in Lightning, Lightning Experience, Release Notes

Salesforce Summer’17: Top 17 Features of Lightning Experience

Salesforce published Summer’17 release(Preview) notes. If You are a lightning lover like me then In this release, you can find lot’s of new features as well as new enhancements, for example, Field History Tracking, New Setup Tab, Keyboard Shortcut, Updated Activity Timeline, Classic Email template in Lightning.

Admin Checklist Get Ready for Summer 17 Salesforce Admins

Take a look below new features in Summer 17 released for Lightning Experience:

1.Access Field History Related Lists in Lightning Experience

This is great news for all Lightning Lovers. Yes, finally you can track the history in Lightning. I posted this idea here  Track and display the field history for standard or custom objects, regardless of which Salesforce interface you’re using. If you added the History related list to objects in Salesforce Classic, you can now see it in Lightning Experience. You can also set up a field history related list in Lightning Experiences.

If you already added the History related list to your objects in Salesforce Classic, you’re all set. In Lightning Experience, look for your History related list (1) under the Related tab (2).

208_field_history_rl_lex.png

2.Switch More Users to Lightning Experience

When you enable Lightning Experience, it’s important to get your users working in—and benefiting from—the new interface. To help, the Switch Users to Lightning Experience tool now displays all users in your org so you can switch the exact group that you want in one go. The tool also makes it easier to find specific users on the list and to see which users in your org are eligible to switch. This change applies to both Lightning Experience and Salesforce Classic.

  1. The Switch Users to Lightning Experience tool is available from the Lightning Experience Migration Assistant in Setup. In the Migration Assistant, click the Set Up Users tab, then click Switch Users.

    lex_switch_user_wizard

Search the user list to find exactly the user you want (1). See at a glance which users have permission to access Lightning Experience and are eligible to switch (2), which users have already switched (3), and which users can’t be switched because they don’t have the Lightning Experience User permission (4).To switch users to Lightning Experience, click the button next to their names.

Unlike before, you can’t use this tool to switch users back to Salesforce Classic. But users can switch themselves back as needed, using the Switcher in their profile menus.

3.Make Lightning Experience the Only Experience

Ready to move from Salesforce Classic to Lightning Experience without looking back? Just hide the option to switch to Salesforce Classic from your Lightning Experience users so that they stay in Lightning Experience. This feature is new in both Lightning Experience and Salesforce Classic.

By default, when you enable Lightning Experience, your users get the Switcher, allowing them to switch back and forth between Lightning Experience and Salesforce Classic. But if you want some or all of your users to stick to Lightning Experience, you can remove the Switcher (1) .

Hide option to switch to Salesforce Classic

In Setup, enable the Hide Option to Switch to Salesforce Classic permission (2) in profiles and permission set.When you enable the permission for your Lightning Experience users, new and existing users see Lightning Experience the next time they log into Salesforce. And, they no longer see the Switch to Salesforce Classic link.

rn_lex_hide_switcher_perm

4. Ditch Your Mouse—Keyboard Shortcuts Are Here

You can now use keyboard shortcuts to maximize your efficiency and speed while working in Lightning Experience. You can search for, edit, save, and close a record—all without touching a mouse. So start planning what you want to do with all the time you’re going to save! By default, keyboard shortcuts work in all Lightning apps. This change applies to Lightning Experience only.

To view the available keyboard shortcuts, press:

  • Windows: Ctrl+/
  • macOS: Cmd+/

Screen shot of the available keyboard shortcuts for standard navigation apps.

For Lighting apps with console navigation, extra shortcuts are available to help users navigate tabs, utilities, and more.

5.Get Better Assistance with the Restyled Lightning Experience Migration Assistant

To guide you through the optimal path to enabling Lightning Experience, we’ve given the Migration Assistant an easier-to-use, wizard-style interface. The tools for assessing and previewing your org’s readiness, setting up features and users, and flipping the switch are now visible at a glance—and faster to access. Oh, and it’s also easier to find the Migration Assistant in Setup. This change applies to both Lightning Experience and Salesforce Classic.

Accessing the Migration Assistant in Salesforce Classic is a no-brainer now. From Setup, click Get Started in the Lightning Experience Migration Assistant tile at the top of the menu. (From Setup in Lightning Experience, continue to access the Migration Assistant from the Lightning Experience link.)

Lightning Experience Migration Assistant tile in Salesforce Classic Setup Menu

 The new Migration Assistant is a clean, concise wizard, with tabs that highlight the steps for transitioning to Lightning Experience.

Restyled Lightning Experience Migration Assistant, with highlight around tabs at the top of the page

The interface focuses on specific tasks, one at a time. But you aren’t restricted to going through the tabs in a sequential order. As before, you can use the Migration Assistant to run tools like the Readiness Check and the Preview whenever and as often as needed. Simply click the desired tab to get down to business.

Check Readiness tab in the Lightning Experience Migration Assistant

6. Relate Accounts to Leads Faster with Account Matching

When sales users convert leads, if the lead company name matches any of your accounts, it’s quick and easy to choose one of the matching accounts. This change applies to Lightning Experience only.

Previously in Lightning Experience, if there was a single exact match between the lead company name and an existing account name, the account populated the Account Name field during lead conversion. New account matching brings Lightning Experience in line with Salesforce Classic.

  • Support for person accounts—If the lead contains a company name, we search business accounts. If there is no company name, we search person accounts instead.
  • Enhanced type ahead—Type-ahead search in the Account Name field now searches across all accounts rather than searching only the user’s recently used accounts.
  • Multiple match—When a user clicks the Account Name field during lead conversion, a dropdown menu includes a list of all accounts that match the lead’s company name. If the lead does not have a company name, the list contains matching person accounts.

7.Add Members to Campaigns from Reports in Lightning Experience

Your marketing department can quickly target specific groups of leads, contacts, or person accounts by adding them to campaigns directly from standard and custom reports. This change applies to both Lightning Experience and Salesforce Classic.

Reps can add up to 50,000 returned records to campaigns by clicking Add to Campaign (1).

The Add to Campaign action on reports

To let marketers add members to campaigns from custom reports, the report’s primary object must be Lead or Contact. The custom report type must also include the Full Name field.Previously, Salesforce Classic allowed members to be added to campaigns only from standard reports. The ability to add members to campaigns from custom report types is available in both Salesforce Classic and Lightning Experience.

8.Decide How Path Displays

A path is now closed when the page loads, helping users view more record details without scrolling. You can configure how users display Path. This change applies to Lightning Experience only.

To view or hide a path’s key fields and guidance, users click.Show More

The Show More button with a closed path.

To let your users decide whether a path’s guidance and key fields display automatically when the page loads, from Setup, enter Path Settings in the Quick Find box, then select Path Settings. Then enable Remember User’s Path Preferences.

9.See Opportunity Stage History in Lightning Experience

Review changes to an opportunity’s amount, probability, stage, and close date on the Stage History related list in Lightning Experience. This change applies to Lightning Experience only.

The Opportunity Stage related list on an opportunity.

10.Show Who Reports to Whom from Contact Pages in Lightning Experience

Give your sales team a key tool for planning sales strategy. Use Lightning Contact Hierarchy to visualize the contacts on an account according to what sales reps enter in the Reports To field. Plus, customize contact hierarchy columns to show the information that’s most useful to your sales teams. This feature is new in Lightning Experience.

Give your sales reps access to the hierarchy from contact pages. In Setup, in the Salesforce1 and Lightning Experience Actions section of your contact page layout, add the View Contact Hierarchy action. The Actions menu includes the View Contact Hierarchy action unless you customized the contact page layout before Summer ’17.

contact_hierarchy_action

The hierarchy shows who reports to whom according to the Reports To field. Sales reps can expand or collapse areas as they navigate. They can view up to 2,000 contacts from each point where they enter a hierarchy. To view contacts in a different part of the hierarchy, a sales rep can enter the hierarchy from a different contact.

contact_hierarchy_action

Email Quote PDFs with One Click

In Lightning Experience, reps can now email one or more quote PDFs by clicking Email PDF in the Quote PDFs related list or list view. This change applies to Lightning Experience only.

11. Be More Productive with the Sales Console (Generally Available)

The Lightning Sales Console app is now generally available. Plus, it also benefits from all the great improvements we’ve made to all Lightning console apps, such as person account support, split view navigation, and keyboard shortcuts. These changes apply to Lightning Experience only.

208_sales_cloud_console.png

12.Lightning Voice: New Name, Call List General Availability, and Voicemail Drop

Lightning Voice has a new name and more call list features. Sales reps can also send pre-recorded voicemail messages and dial numbers in reports and dashboards. These changes apply to Lightning Experience only.

Organize Calls with a Call List (Generally Available)

To create a call list, reps can select the people they want to call, and click Add to Call List.

voice_call_list_select
The prioritized list appears in the call panel. In addition to leads, call lists also support accounts, person accounts, and contacts.

voice_call_list_panel
Reps can click Call Next to dial the number at the top of the list and open the related record. Only one call list is available at a time.

Send Prerecorded Voicemail Messages

Save time with custom voicemail messages. Reps can “drop” (or send) prerecorded messages to recipients’ voicemail boxes to focus their time on selling. This change applies to Lightning Experience only. To create a voicemail message, reps can select Voicemail Settings from the call panel or their personal settings.

voice_voicemail_record

13.Use Your Classic Email Templates in Lightning Experience

Leverage all the work and planning that went into your Salesforce Classic email templates by using the same templates in Lightning Experience. You can use your Text, Custom HTML, and Letterhead email templates in Lightning Experience. This change applies to Lightning Experience only.

When you insert an email template, change the filter to Classic Templates.

rn_sales_productivity_email_templates_CEX_in_LEX

14.Stay on Top of Things with the Updated Activity Timeline

Quickly see what each activity is about with easily read summaries. Need the details? Click Expand to see more, without leaving the timeline. Want to drill deeper into your day? Click Expand All to see all the details on all the activities in your timeline. This change applies to Lightning Experience only.
rn_sales_productivity_activity_timeline_annotated
You can expand each activity individually, or expand and collapse the entire list of activities at once. Expanded emails are shown just like they were sent, with paragraphs and line breaks in the same place. You can take actions from within the email summary, too.

rn_sales_productivity_activity_timeline_expanded_email

15.Home: Assistant and Performance Chart Updates

The Assistant has a new look, and the performance chart now has both a weekly and daily view. These changes apply to Lightning Experience only.

See Assistant Updates in a New Way

The Assistant has a slightly different look and feel. Click > to see more details about a specific update. This change applies to Lightning Experience only. Your sales reps can also quickly act on different updates with the new action buttons, such as sending an email or editing an opportunity.

home_assistant_revamp

See Multiple Views of the Performance Chart

The performance chart displays opportunities for the current sales quarter that are closed or open with a probability over 70%. Sales reps can now switch between a weekly and daily view. This change applies to Lightning Experience only.
home_performance_chart_view

16.Add Dashboard Filters in Lightning Experience

Add, edit, or remove filters from your Lightning Experience dashboard directly from the lightning dashboard builder. Filters let people choose different views of a dashboard, so one dashboard does the job of many. Without dashboard filters, you’d have to create multiple dashboards, each with its own set of filtered reports. For example, add a filter on the industry field to track opportunities by industry. This feature is new in Lightning Experience.

rd_dashboards_filter_add

17. Create Report and Dashboard Folders in Lightning Experience

Folders are key to sharing and organizing reports and dashboards. Now you can create them in Lightning Experience. Switch to Salesforce Classic to grant other people access to folders. This feature is new in Lightning Experience.

rd_reports_dashboards_folders_create

There are many more powerful features in Summer’17 Release notes. For complete list of Summer’17, Release Notes click here  

Posted in Lightning Design System, Lightning Experience, Salesforce

Salesforce Lightning View All Activities

Are you working on Lightning experience? Then definitely you are missing the View All Activities button in Lightning.I am a big fan of Salesforce Lightning Experience. However, many community people keep asking me how to get the activities > VIEW ALL functionality they know and love from Classic. I got this blog post idea from Salesforce MVP @David Giller to think about a workaround for View All button in Lightning.

You can promote and upvote this idea here Allow View All Activities on records in Lightning

Collaboration   Salesforce Success Community.png

So I am writing this post to give step by steps solutions for this issue. Follow below steps :

Step 1. First, create an apex controller to get all the activities related to your sObjects. Here I created one solution for all sObjects. Use below apex controller.

public class ShowAllSObjectActivity {
Id sObjectname= ApexPages.currentPage().getParameters().get(‘Id’);

public list tasklist{get;set;}
public ShowAllSobjectActivity(){

if(sObjectname !=null )
tasklist= [select id,Status,ActivityDate,Subject,Who.Name,What.Name,Description,LastModifiedDate,Owner.Name FROM Task WHERE WhatID=:sObjectname OR whoId=:sObjectname];
}
public PageReference cancel() {
PageReference ldPage = new PageReference(‘/’+sObjectname);
ldPage.setRedirect(true);
return ldPage;
}
}


Step 2. Create visualforce page to display all activities on click on View All button in Lightning Experience. Here I used SLDS(Salesforce Lightning Design System) to design the page similar to lightning experience. So don’t forget to add SLDS in your static resource before creating this page.

<apex:page controller="ShowAllSObjectActivity" sidebar="false" standardStylesheets="false">
<apex:sectionHeader title="View Activity History"/>
<apex:form >
<html xmlns="http://www.w3.org/2000/svg" xmlns:xlink="http://www.w3.org/1999/xlink" lang="en">
	<head>
		<meta charset="utf-8" />
		<meta http-equiv="x-ua-compatible" content="ie=edge" />
		<meta name="viewport" content="width=device-width, initial-scale=1" />
		<apex:stylesheet value="{!URLFOR($Resource.SLDS103, 'assets/styles/salesforce-lightning-design-system-vf.min.css')}" />
		head> 
		<div class="slds">
		<div class="slds-grid slds-wrap slds-grid--pull-padded">
		<div class="slds-p-horizontal--small slds-size--1-of-1">
		<center>
		<apex:commandLink action="{!cancel}" value="cancel" styleClass="slds-button slds-button--neutral"/>
		center> div> 
		<div class="slds-p-horizontal--small slds-size--1-of-1">
		<apex:repeat value="{!tasklist}" var="oSobject">
		<div class="slds-border--top">
		<div class="slds-form-element">
		<div class="slds-form-element__control slds-has-divider--bottom">
		<b> <span class="slds-form-element__addon">Subjectspan>b> <span class="slds-form-element__static"> 
		<apex:outputText value="{!oSobject.Subject}" />
		span> div> div> 
		<div class="slds-form-element">
		<div class="slds-form-element__control slds-has-divider--bottom">
		<b> <span class="slds-form-element__addon">Namespan>b> <span class="slds-form-element__static"> 
		<apex:outputText value="{!oSobject.Who.Name}" />
		span> div> div> 
		<div class="slds-form-element">
		<div class="slds-form-element__control slds-has-divider--bottom">
		<b> <span class="slds-form-element__addon">Related Tospan>b> <span class="slds-form-element__static"> 
		<apex:outputText value="{!oSobject.What.Name}" />
		span> div> div> 
		<div class="slds-form-element">
		<div class="slds-form-element__control slds-has-divider--bottom">
		<b> <span class="slds-form-element__addon">Due Datespan>b> <span class="slds-form-element__static"> 
		<apex:outputField value="{!oSobject.ActivityDate}" />
		span> div> div> 
		<div class="slds-form-element">
		<div class="slds-form-element__control slds-has-divider--bottom">
		<b> <span class="slds-form-element__addon">Assigned Tospan>b> <span class="slds-form-element__static"> 
		<apex:outputText value="{!oSobject.Owner.Name}" />
		span> div> div> 
		<div class="slds-form-element">
		<div class="slds-form-element__control slds-has-divider--bottom">
		<b> <span class="slds-form-element__addon">Last Modified Date/Timespan>b> <span class="slds-form-element__static"> 
		<apex:outputField value="{!oSobject.LastModifiedDate}" />
		span> div> div> 
		<div class="slds-form-element">
		<div class="slds-form-element__control slds-has-divider--bottom">
		<b> <span class="slds-form-element__addon">Commentsspan>b> <span class="slds-form-element__static"> 
		<apex:outputText value="{!oSobject.Description}" />
		span> div> div> div> 
		<hr style="background-color:black;"/>
		apex:repeat> div> div> div> html> apex:form> apex:page>

Steps 3. Then you are ready to use this custom solution to display all activities in lightning. You can create a custom button to call this visualforce page in lightning. Go to your object where do you want to add this button. Then go to Buttons, Links, and Actions >
Click New > Add New Detail page button and in Content Source use URL and in formula editor paste this

/apex/YourVisualforcePageName?Id={!Sobject.Id}

edit-account-custom-button

You can now create these buttons for All sObjects and use the same Formula /apex/YourVisualforcePageName?Id={!Sobject.Id} and use your object name in place of sObject.

Step 4. In the previous step, you created the View All Button now we have to add that button to page layout in the respective object. Here, for example, I am adding this button to Lead page layout. Follow these steps here

A.  On object detail page click on  Setting Gear Icon on top of the page > Edit Object

Kathy Snyder   Salesforce2.png

B. Go to page layouts.

object-manager-lead-salesforce

C.Click on respective Lead page layout where you want to add View All button.

Lead Layouts.png

D.Click ‘Override the Predefined actions’

Edit Page Layout  Opportunity Layout   Salesforce   Developer Edition   Salesforce.png

E. Drag and Drop ‘View All’ from salesforce 1 Actions and save the page layout and go to Lead record detail page.

Edit Page Layout  Lead Layout   Salesforce   Developer Edition.png

F.Now you can see ‘View All’ button appear in a Lead object.

view-all

Wow, You are ready to view all activities now. Click on “View All” button and it will open a new page and you can view all your activities on the same page similar to classic.

Salesforce   Developer Edition   Salesforce.png

In the same way, we can add this View All button to any objects in Lightning experience. Kindly let me your feedback in comment section below.

lightning

GitHub Repository

You can also download the code from the github repository here.